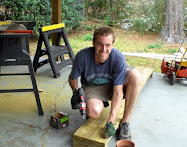
Scott got a bunch of new power tools from his parents for Christmas/birthday. Uncle George also gave Scott some of his fancy tools that he didn't need anymore, and Uncle Bob gave him even more useful tools. The result? I now have an awesome potting bench in the storeroom! (Thanks Don, Cindy, Uncle George and Uncle Bob!)
Here it is:

It has a nice, big work surface. (To the right in the picture are some plants I am overwintering for myself and my friend Katherine, who is away on military duty.)
The bottom shelf is for starting seeds. We have a 4-ft. fixture with two full-spectrum
fluorescent bulbs. It is hung by an adjustable chain and will be raised as the seedlings emerge and grow taller.

I started some seeds today - tomato, bell pepper, eggplant, basil. Last year I started all of my seeds at the same time, outside in one of those tabletop greenhouses. It was the first year I grew all of my vegetables from seed. Everything grew and eventually prospered, but I learned some lessons for this year. Namely, not everything grows at the same rate! My cucumber vines were producing cucumbers before my tomatoes and peppers were ready to be transplanted to the raised beds!
This year I'm starting my seeds under lights, in the storeroom where it is a little warmer. I'm not starting the cucurbits until much closer to planting time. And I'm taking the time to do the little things that will pay off in spades later on:

1. Using a soil mix made specifically for seed-starting, and mixing in the appropriate amount of water to moisten it before planting the seeds.

2. Keeping a record of which seeds I planted where. Last year I thought I could remember, and ended up with about 20 good tomato plants, unable to determine (at transplanting time) which ones were the red better boys and which ones were the yellow clementines. I guessed and hoped for half and half. I ended up planting nine better boys and three clementines, which was too bad as the clementine tomatoes (seeds from Hannah at This Garden is Illegal - thanks!) were so delicious and much healthier plants. Lesson learned!
 I should have included this picture in the original post about the potting bench. This is the storeroom/potting shed before Scott put up walls, painted it sunny light yellow, put up pegboard, and built the sweet bench. The after photo is quite an improvement, huh?


 It was strong and easy to handle. I put the strips in my raised beds, covered them with a little soil, and watered. Unfortunately, the squirrels dug up and destroyed all the seed tape in days! I suppose they were looking for nuts. Not surprisingly, nothing germinated. Maybe next year I will use floating row covers or red pepper flakes sprinkled in the beds.